[ DAG, Directed Acyclic Graph ]
DAG는 유향 비순환 그래프 라고 한다. 수많은 꼭짓점과 간선으로 구성된다. 꼭짓점은 Task이고 간선은 Flow 나 Branch 같이 조건에 의한 흐름으로 볼 수 있다. Airflow는 DAG를 정의해고 DAG 통해서 작업을 실행시켜서 작업(Task)을 진행한다. 그러므로 DAG를 잘 다룰 수 있다면 Airflow를 잘 다룰 수 있다고 보면 된다.


[ BashOperator ]
from airflow.operators.bash_operator import BashOperator
from airflow.models import DAG
from datetime import datetime, timedelta

args = {
    'owner': 'airflow',
    'start_date': datetime(2020, 12, 1)
}

dag = DAG(
    dag_id='hello_airflow',
    default_args=args,
    schedule_interval="@once")

# Bash Operator
cmd = 'echo "Hello, Airflow"'
BashOperator(task_id='t1', bash_command=cmd, dag=dag)
BashOperator는 bash 명령어를 사용할 수 있는 Operator이다. 간단하게 echo 명령어로 DAG를 만들어서 Airflow 공유 폴더(윈도우즈 : "C:/users/dorumugs/docker/airflow", 리눅스 : "/shared" )에 넣어주면 된다. Dag 안에는 여러 개의 task가 있는데 이 task 들을 task_id로 구분한다. 위 코드에서는 task_id를 "t1"으로 입력했고 아래 DAG를 보면 간단하게 t1 task를 확인할 수 있다.

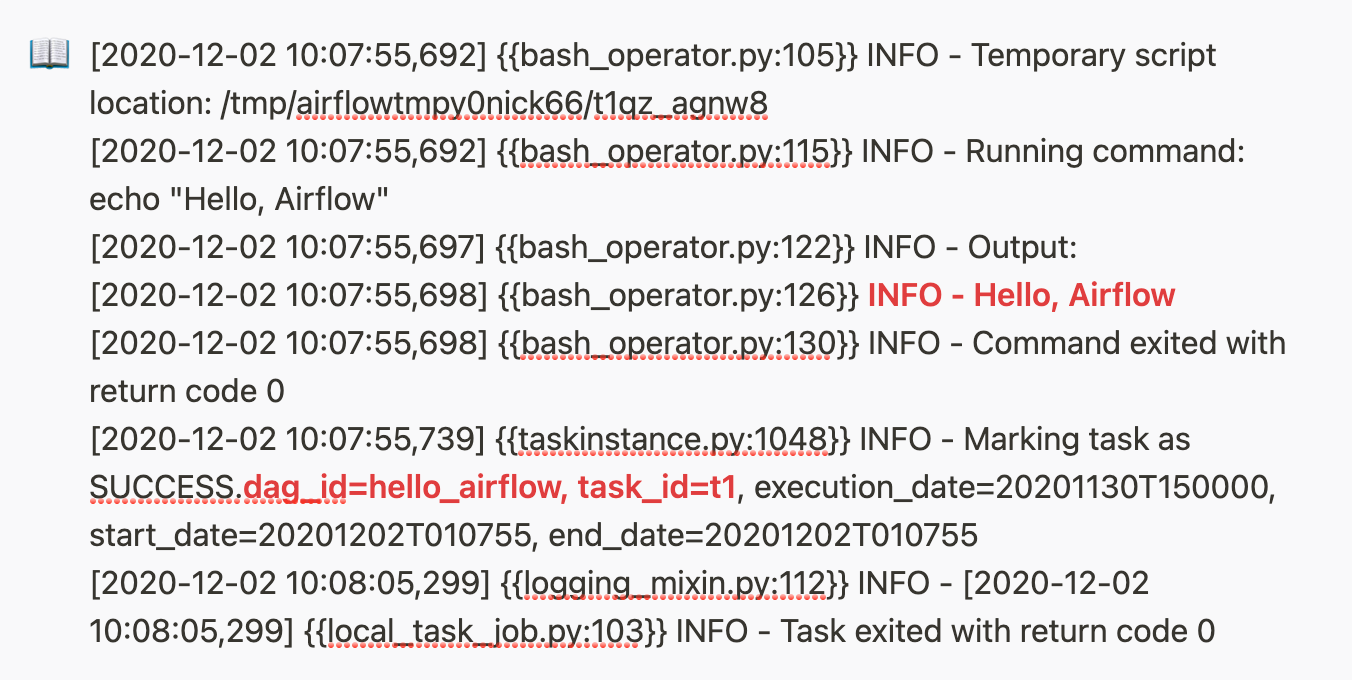
DAG를 실행하면 로그에서 dag_id "hello_airflow"가 잘 실행되는 것을 확인할 수 있다. bashOperator를 사용해서 출력하면 로그에서 확인할 수 있다는 것을 알아두면 좋다. 기본적인 DAG의 사용법인 bashOperator는 나중에 실행 결과를 다음 task로 넘기거나 하는 작업에서 유용하게 사용될 수 있다.

[ XCOM + PythonOperator ]
from airflow import DAG
from airflow.utils.dates import days_ago
from airflow.operators import PythonOperator
from datetime import datetime, timedelta
import random

args = {
    'owner': 'airflow',
    'start_date': days_ago(2),
}

dag = DAG(dag_id='my_sample_dag', default_args=args, schedule_interval=None)

def run_this_func(**context):
	received_value = context['ti'].xcom_pull(key='random_value')
	print(f'hi, i received the following {str(received_value)}')

def push_to_xcom(**context):
	random_value = random.random()
	context['ti'].xcom_push(key='random_value', value=random_value)
	print('I am okay')

with dag:
	run_this_task = PythonOperator(
		task_id='run_this',
		python_callable=push_to_xcom,
		provide_context=True,
		retries=10,
		retry_delay=timedelta(seconds=1)
	)

	run_this_task2 = PythonOperator(
		task_id='run_this2',
		python_callable=run_this_func,
		provide_context=True

	)

	run_this_task >> run_this_task2
xcom은 교차통신으로 dag가 만들 결과를 다은 dag로 전달 할 수 있다. task "run_this"에서 만든 결과를 task "run_this2"로 전달하는 기능을 할 수 있다. with를 사용해서 dag들을 묶어주고 ">>"와 "<<"를 통해 task끼리 서로를 연결할 수 있다. run_this 에서 만든 value를 xcom으로 run_this2 한테 전달할 수 있다. 이런 값은 마지막 Sequence 나 Index 으로 사용하여 최신 데이터를 유지하기 위한 지표로 사용할 수 있다.


[ BranchPythonOperator ]
from airflow import DAG
from airflow.utils.dates import days_ago
from airflow.operators import PythonOperator, BranchPythonOperator
from datetime import datetime, timedelta
import random

args = {
    'owner': 'airflow',
    'start_date': days_ago(2),
}

dag = DAG(dag_id='my_sample_branch_dag', default_args=args, schedule_interval=None)

def print_hi(**context):
	received_value = context['ti'].xcom_pull(key='random_value')
	print(f'hi, i received the following {str(received_value)}')

def print_hello(**context):
	received_value = context['ti'].xcom_pull(key='random_value')
	print(f'hello, i received the following {str(received_value)}')

def push_to_xcom(**context):
	random_value = random.random()
	context['ti'].xcom_push(key='random_value', value=random_value)
	print('I am okay')

def branch_func(**context):
	if random.random() < 0.5:
		return 'say_hi_task'
	return 'say_hello_task'
	pass

with dag:
	run_this_task = PythonOperator(
		task_id='run_this',
		python_callable=push_to_xcom,
		provide_context=True,
		retries=10,
		retry_delay=timedelta(seconds=1)
	)

	branch_op = BranchPythonOperator(
		task_id='branch_task',
		python_callable=branch_func,
		provide_context=True
	)

	run_this_task2 = PythonOperator(
		task_id='say_hi_task',
		python_callable=print_hi,
		provide_context=True

	)

	run_this_task3 = PythonOperator(
		task_id='say_hello_task',
		python_callable=print_hello,
		provide_context=True

	)

	run_this_task >> branch_op >> [run_this_task2, run_this_task3]
dag들을 연결할 때, Condition을 줘서 조건에 따라 사용 유무를 정할 수 있다. random.random() > 0.5가 참 일 경우 'Hi' 를 출력하고random.random() < 0.5가 참 일 경우 'Hello'를 출력한다. 위 코드를 실행한 결과 랜덤 값에서 0.2093120953544 을 얻었고 0.5보다 작으므로 Hello를 출력하는 say_hello_task를 호출한다. 해당 task로 이동하면 "hello, i received the following 0.20931209535442008" 라고 로그에 출력하고 상태가 초록색인 "success"가 된다.


[ FileSensor ]
from airflow import DAG
from airflow.utils.dates import days_ago
from airflow.operators import PythonOperator
from airflow.contrib.sensors.file_sensor import FileSensor
from datetime import datetime, timedelta

args = {
    'owner': 'airflow',
    'start_date': days_ago(2),
}

dag = DAG(dag_id='my_sample_sensor_dag', default_args=args, schedule_interval=None)

def say_hi(**context):
	print('hi')

with dag:
	sensing_task = FileSensor(
		task_id='sensing_task',
		filepath='/shared/test.txt',
		fs_conn_id='fs_default',
		poke_interval=10
	)

	run_this_task = PythonOperator(
		task_id='run_this',
		python_callable=say_hi,
		provide_context=True,
		retries=10,
		retry_delay=timedelta(seconds=1)
	)


	sensing_task >> run_this_task
FileSensor는 신규 파일이 생성되었을 경우 해당 파일을 감지하여 Task 를 실행하거나 다음 Task로 이동시키는 Operator이다. 코드에서 특정 경로를 감지하고 있다가 개발자가 정의한 파일명이 생성될 경우, 자동으로 감지하여 다음 Dag로 이동한다. 코드에서는 /shared/test.txt 폴더를 감지하게 설정했다. 이후 시스템에 접근하여 touch로 파일을 생성했고 FileSensor는 생성된 파일을 감지한 후 dag(run_this)로 이동한다.
코드에서 보면 fs_conn_id 가 있는데 이건 다양한 파일 시스템을 지원한다. 파일시스템에서 지원하는 폴더로 접근하여 파일을 생성할 경우 FileSensor가 감지할 수 있다. fs_conn_id는 Airflow의 Admin 탭에서 생성할 수 있고 Conn Id를 통해 이름을 추가해서 코드에 적용 시킬 수 있다.

[ FSHook ]
from airflow import DAG
from airflow.utils.dates import days_ago
from airflow.operators import PythonOperator
from airflow.contrib.sensors.file_sensor import FileSensor
from airflow.contrib.hooks.fs_hook import FSHook
from datetime import datetime, timedelta
import os
args = {
    'owner': 'airflow',
    'start_date': days_ago(2),
}

dag = DAG(dag_id='my_sample_hook_dag', default_args=args, schedule_interval=None)

def print_file_content(**context):
	hook = FSHook('fs_default')
	base_path = hook.get_path()
	path = os.path.join(base_path,'shared/test.txt')
	with open(path, 'r') as fp:
		print(fp.read())
	os.remove(path)

with dag:
	sensing_task = FileSensor(
		task_id='sensing_task',
		filepath='/shared/test.txt',
		fs_conn_id='fs_default',
		poke_interval=10
	)

	read_file_content_task = PythonOperator(
		task_id='read_file_content_task_id',
		python_callable=print_file_content,
		provide_context=True,
		retries=10,
		retry_delay=timedelta(seconds=1)
	)


	sensing_task >> read_file_content_task
FSHook의 FS는 파일 시스템이다. 이 기능은 특정 파일을 모니터링하고 있다가 인풋이 들어왔을 때, 다음 dag로 이동하게 한다. poke_interval을 통해서 몇 회 리스닝하고 있을지를 정할 수 있다. 코드에서는 "Poking for file /shared/test.txt" 라는 로그를 10회 남긴다. "gogogogoGo~" 라는 텍스트를 echo 명령어로 test.txt 파일에 삽입했다. 이 후 "gogogogoGo~" 라는 텍스트가 test.txt에 입력이 되었을 때, Success가 되면서 다음 dag로 이동한다.


'동굴 속 정보' 카테고리의 다른 글
| 알고보면 갓띵작 미밴드5 (0) | 2020.12.28 |
|---|---|
| SCI 논문을 탐해보자 (0) | 2020.12.27 |
| AirFlow Manual on Docker (2) (0) | 2020.12.21 |
| AirFlow Manual on Docker (1) (0) | 2020.12.20 |
| 강남 성지 중에서 가장 강력한 성지 (6) | 2020.12.19 |


